Visual debugging for Swift Package Manager projects on Linux
May 9, 2021
Last week I wrote about how to install and use lldb-vscode and Emacs dap-mode to visually debug Swift Package Manager projects outside of Xcode. Unfortunately the process still depended on the LLDB.framework packaged with Xcode, which meant that you still needed a Mac with Xcode installed.
In this post we’ll go through a similar process, except we’ll do it on Linux and without any need for Xcode. By the end you’ll be able to use Emacs (or VSCode or other editor that can use VSCode extensions) to visually debug Swift Package Manager projects on Debian 10 (“buster”).
Upgrade binutils
Building Swift requires a newer binutils than the one included with Debian 10. I think it’s related to this bug in ld. We’ll need to upgrade to the unstable version of binutils (2.35.2 as of this writing).
First, enable the unstable and testing repos for apt.
Now, install the unstable binutils:
sudo apt update
sudo apt-get install binutils/unstable
Try ld --version. You should see 2.35.2 or newer.
Configure LD_LIBRARY_PATH
I think that if you install a new version of ld (like we just did) you need to configure it so that linked executables correctly look for libraries in /etc/local/lib. On Debian 10 we just need to run:
sudo ldconfig
Install Debian 10 dependencies
I’m starting with a fairly minimal installation of Debian 10 so I’ll need to install some dependencies that you may or may not need. This will vary for other distributions of course.
sudo apt-get install
cmake ninja-build libedit-dev libpython3-dev libcurl4-gnutls-dev libsqlite3-dev
Build Swift from Source
Last week we cloned the llvm-project repository and built it standalone, without Swift. This time we’ll clone the Apple Swift project and use its build scripts to pull in and build llvm-project as a dependency. This is the longest step of this procedure so leave yourself ample time.
My personal projects directory is ~/Proj and I’ll be using it through the rest of this post. Feel free to substitute your own.
cd ~/Proj
git clone https://github.com/apple/swift
git checkout swift-5.4-RELEASE
./utils/update-checkout --clone
./utils/update-checkout --tag swift-5.4-RELEASE
./utils/build-script \
  --clean \
  --lldb \
  --llbuild \
  --release \
  --no-assertions \
  --xctest \
  --foundation \
  --libdispatch \
  --libicu \
  --swiftpm \
  --install-destdir="~/Proj/swift-install" \
  --install-all
I had this fail several times, each time with a missing library dependency. If that happens to you install the missing library with sudo apt-get install and then reissue the same ./build-script command but omit the --clean flag. This will allow the build to pick up from roughly where it left off.
Eventually you’ll have a fully built Swift project in the ~/Proj/swift-install directory.
Copy the built files into your /usr/local folder
sudo cp -R ~/Proj/swift-install/usr/* /usr/local/
Install the lldb-vscode extension
Create the required directory in your home folder and copy the extension:
mkdir -p ~/.vscode/extensions/llvm-org.lldb-vscode-0.1.0/bin
cd ~/Proj/build/Ninja-Release/lldb-linux-x86_64
cp bin/lldb-vscode ~/.vscode/extensions/llvm-org.lldb-vscode-0.1.0/bin
Grab the package.json
For some reason the build_script doesn’t create the package.json file required for the lldb-vscode extension. You can download the one we built last week and save it into this directory:
~/.vscode/extensions/llvm-org.lldb-vscode-0.1.0
You should now be able to start lldb-vscode. From the command-line
cd ~/.vscode/extensions/llvm-org.lldb-vscode-0.1.0/bin ./lldb-vscode
If you don’t see any errors you’re in good shape. Hit Ctrl-C and let’s continue.
Install Vapor and build Hello World
You can use any SwiftPM project for this step but we’ll continue to use Vapor for our example. I’m using version 3.1.9 here but choose whatever you like.
cd ~/Proj
git clone https://github.com/vapor/toolbox.git
cd toolbox
git checkout 3.1.9
make install
Type vapor --help to confirm that it is installed. Now create and build the Hello World project.
cd ~/Proj
vapor new hello -n
cd hello
swift build
Add the dap-debug template into Emacs
Assuming you’re using Emacs and have installed and configured dap-mode (you can read more about this in last week’s post), you need to add a debug template to your Emacs config for the Hello World we’ve just built. Here’s the one I’m using.
(dap-register-debug-template "Vapor Hello World Linux"
  (list :type "lldb-vscode"
        :cwd "/home/gene/Proj/hello/.build/x86_64-unknown-linux-gnu/debug"
        :request "launch"
        :program "/home/gene/Proj/hello/.build/x86_64-unknown-linux-gnu/debug/Run"
        :name "Run"))
Evaluate this region or reload your Emacs config.
Set a breakpoint and see if it hits
The steps in this section are identical to what we did on the Mac last week.
In Emacs, start debugging with M-x dap-debug. Select the template you just added: that should launch the Vapor web server and the Hello World app.
Find the file Sources/App/routes.swift in the Hello World project. Move the point to the line that says return "It works!" (line 5 for me). Issue M-x dap-breakpoint-add. You should see a breakpoint indicator dot appear to the left of the line.
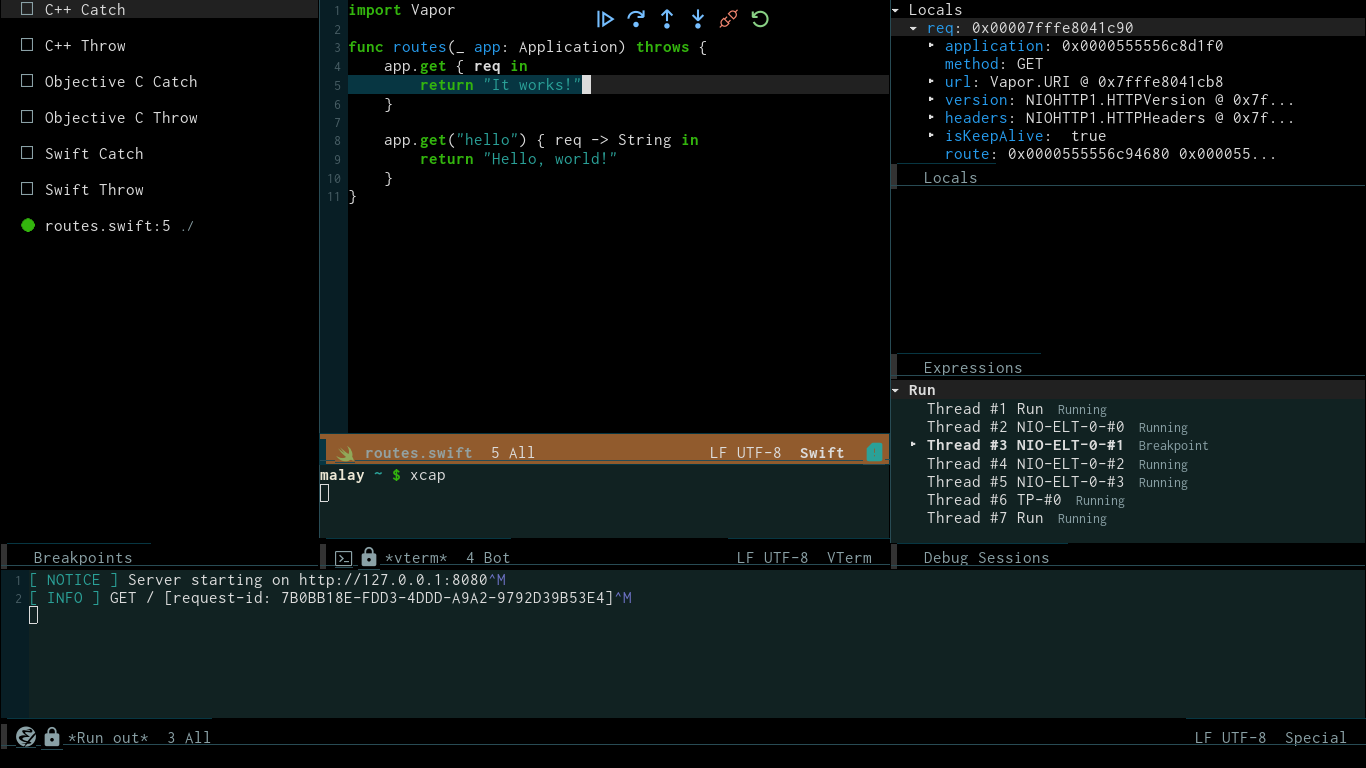
Open a web browser and navigate to http://127.0.0.1:8080. Your breakpoint should hit and you’ll see something like this.

Figure 1: Breakpoint hit
Under Locals (top-right on my screen), if you click on req it will expand and show you the Vapor request properties at the time your breakpoint was hit.
The stack trace is available by clicking the Run label in the Debug Sessions pane. To stop debugging issue M-x dap-disconnect.
And there we have it: a full visual debugging solution for Swift Package Manager projects in Linux, with no Xcode required.
